Recover deleted or lost photos from digital cameras (Mac & Windows)
 Nowadays, many people have digital cameras and take countless pictures with friends to attach with their precious memory. Photos mean a lot. However, sometimes photos are gone from your cameras and maybe you are very sad for lost photos. Do not be panic, just be relaxed. Whether your photos were deleted, formatted, or lost by any other reasons, generally you can still get these lost photos back as long as you stop taking photos or saving new photos to your SD card after the loss.
Here I will introduce a useful and reliable tool to recover your photos. Photo-recovery software is a good choice and gives you chances to get back your deleted or lost photos from your digital cameras.
Common reasons of digital photos loss:
There are many reasons that cause digital camera photos loss and several reasons are listed here.
- Accidentally deleting: you may delete your digital photos by accident. When previewing pictures on your cameras, you may press "Delete" button.
- Unintentionally formatting memory cards: accidentally, you may format your camera memory cards.
- Power Interruption: low battery can result in the loss of digital photos when you are taking photos.
- Virus infections.
- Corrupted memory card: memory cards get corrupted and cause your photos loss.
- Equipment breakpoint, plugging or unplugging connecting lines incorrectly.
- Any other unkown situation where you cannot access your digital photos.
CF Card Recovery is an efficient digital camera recovery tool specially designed for Mac and Windows users. It is relatively simple to use and safe. recovers deleted or lost photos from almost all digital cameras, including digital SLR cameras. support the recovery of photos in different formats, such as TIFF, JPG, GIF, PNG,NEF, CR2, RAF, X3F, PEF, ORF, MRW, ARW, SR2, CRW, RAF, DCR, DNG, and etc.
Furthermore, CF Card Recovery rescues the lost photos on your digital camera for not only Windows users and Mac users. In addition, no matter what digital cameras (e.g. Canon, Olympus, Nikon, Fuji, Pentax, etc) you are using, no matter what reasons cause your photo loss, CF Card Recovery can perfectly get your lost digital photos back.
Steps to finish digital camera recovery:
5 simple steps to recover deleted photos from digital camera on Mac OS X.
Step 1: InstallFirstly, install and launch the CF Card Recovery in your computer.
Step 2: Connect
Then you should connect your digital camera or your CF card to the computer.

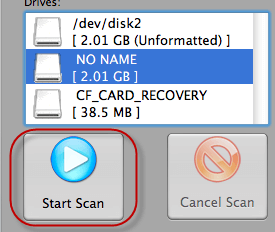
Step 3: Choose the type of image formats, or select the model camera you are using.
After connecting, you need to select the digital camera where you loss photos and click the "Start Scan" button to start scanning to pick up the lost digital camera photos. You need to make sure that all the formats of your lost photos are selected here.

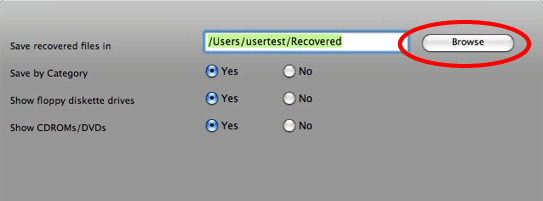
Step 4: Select the output folder
Click the Options button and select the destination folder where you want to save the recoverable photos.
Note: Do not select your digital camera or memory cards as the destination, as this will destroy the photos on the card and it will not be recoverable! You can directly save on your computer or save them to other digital devices. The default is My Documents\My Pictures\Recovered.
Step 5: Start Scan
Click the "Start Scan" button, and wait while the recovery process is completed. The software found all of the photo files and placed them in a "Recovered" folder on your hard drive.
Your photos are now recovered and saved. Finished, you will find the lost photos in the destination folder and continue to share photos with your families and friends. So easy and amazing! All lost digital photos come back!
Important Note:
You need to pay attention to the following tips.
Firstly, do NOT save CF Card Recovery program on the memory cards where you lost your digital photos. Secondly, to avoid overwrite the lost photos, Do NOT save the recovered photos into the original disk where you loss them in your camera again.
Related articles: